| My Lab & Shop Update 05-Sep-2025 |
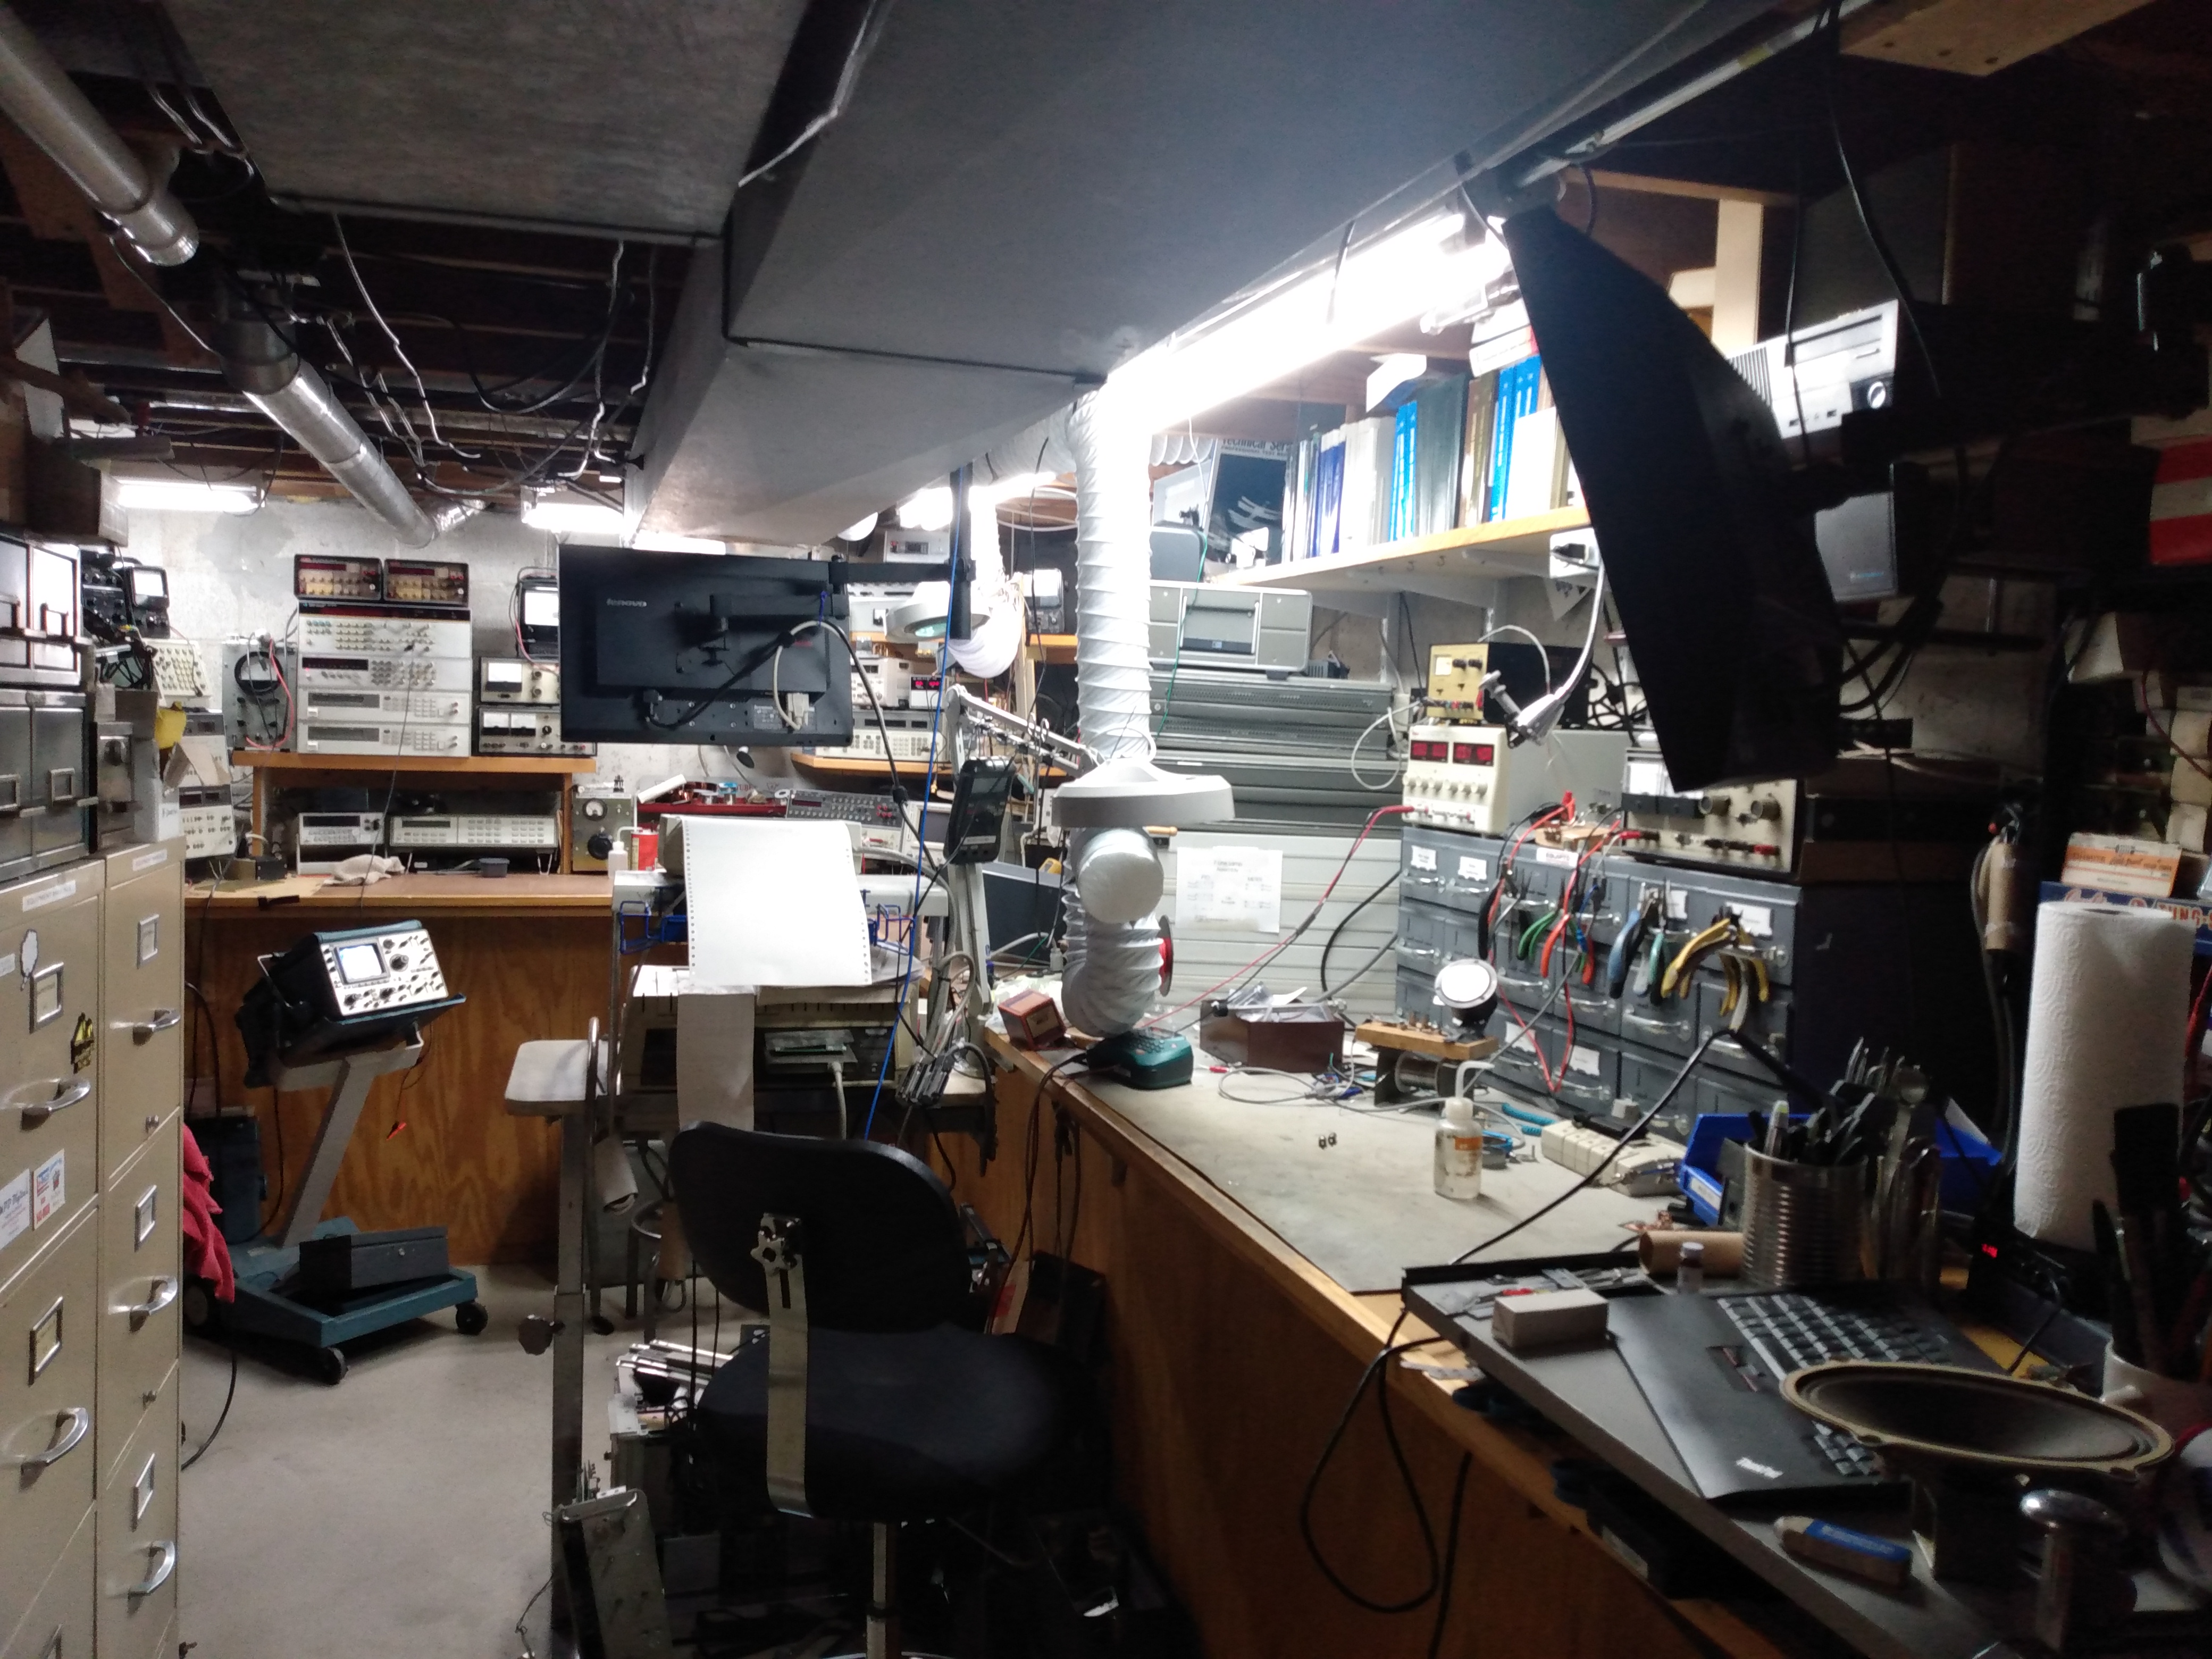 Entering the lab...... 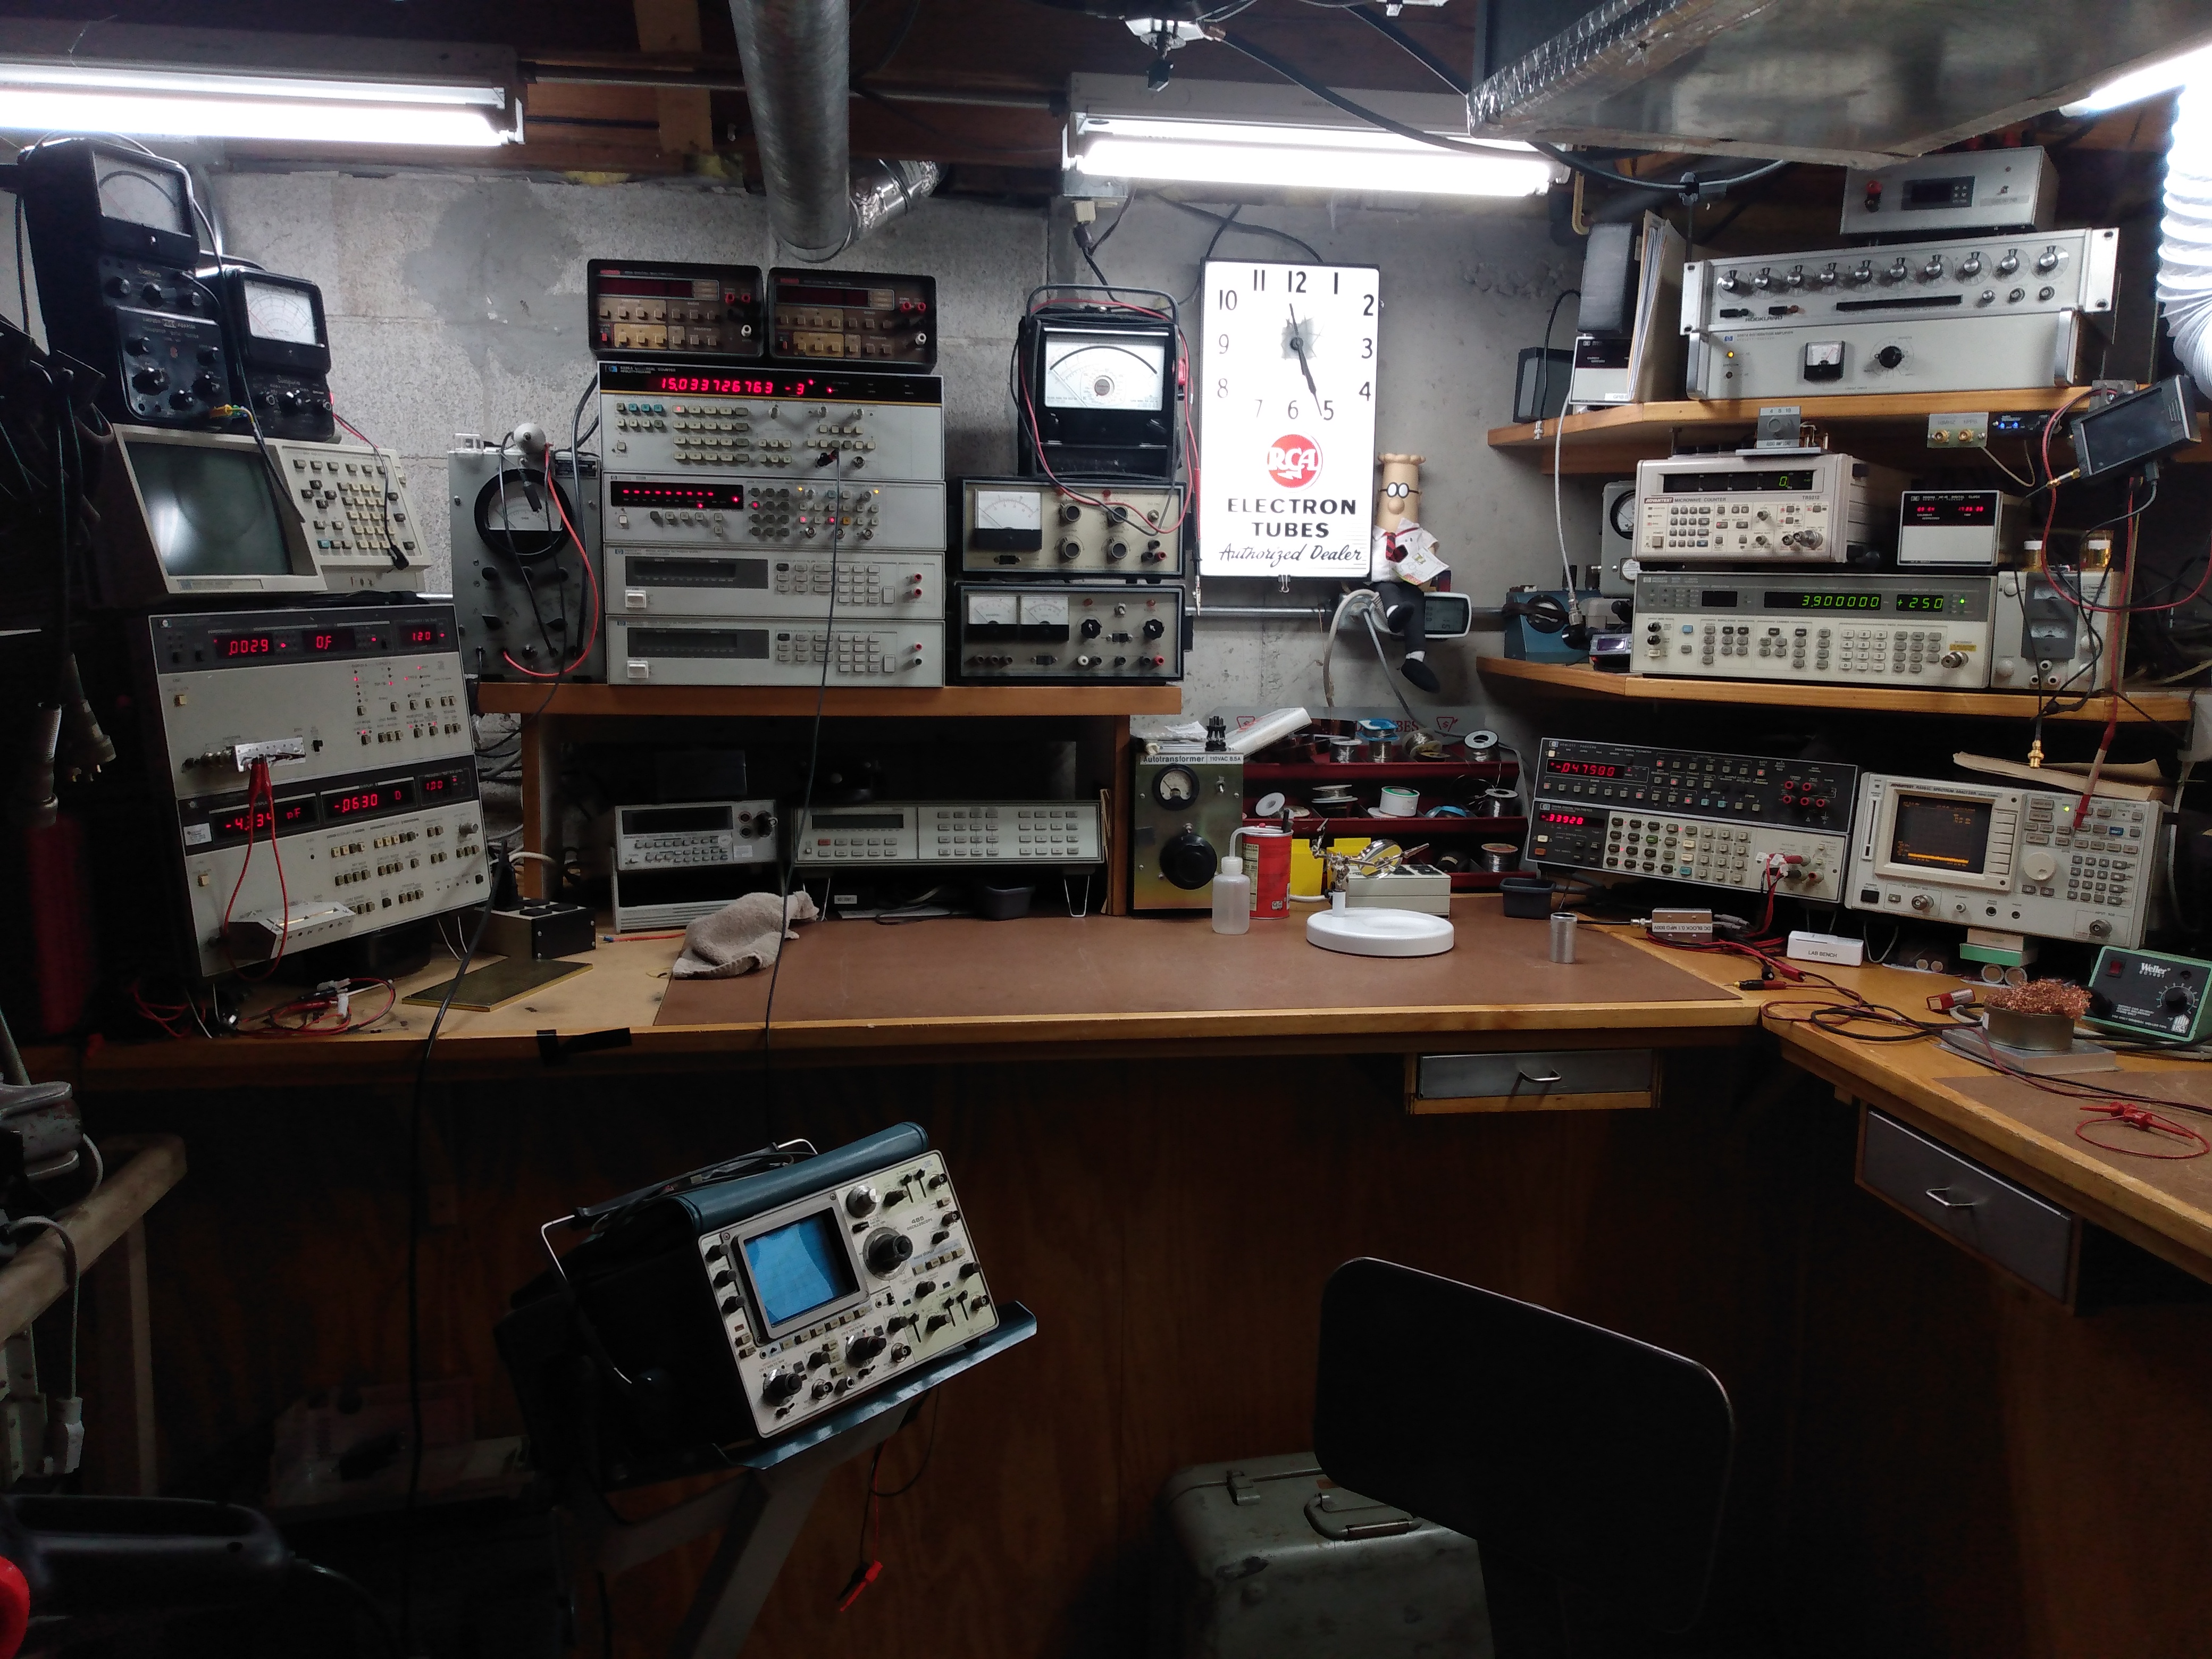 Bench #3 and
Common Corner Area (Described Later)
I have a dedicated Lab and Shop area of approximately 600 sq,ft. About 70% of that area is my electronics lab and storage area. I have been interested in electronics and radio since I was around ten years old in 1968. You do the math! I've collected a great many radios, most of which are long gone, but still amass a rather decent collection to this day. In addition, to the radios themselves are electronic parts dating from the 1920's up to modern surface mount components. The Shop area contains the tools for working on the structural side of things. Containing items like a drill press, band saw, bench sander, bench grinder, bench vise, etc. That plus a wall and drawers of tools that I've collected over a life time. In addition is a decent collection of scrap metals and plastics for using on construction projects. The larger area is in the lab. I will skip the shelving units that contain all the parts drawers, bins, cabinets and boxes. I've kept it fairly organized over the years but maybe not always logical, since periodically things would expand beyond one area and thus multiple areas may contain similar items. I've been living with this current lab location now for over thirty years and I know where just about everything is. Along two walls (west and south side) are primarily work benches, along with some area dedicated to storage (see top picture). However, those same walls are comprised of three work benches and a corner common area of electrical instruments. Bench #1 is my primary bench used for quick easy repairs, often those honey-do items, and is also the main area for the building of my business products in the LED, RF Cable assemblies and other general radio related offerings. The #1 Bench is also the first encountered when entering the lab area. This bench usually stays pretty clean, or at least it has an area I can always work at, since product construction is almost always happening here. 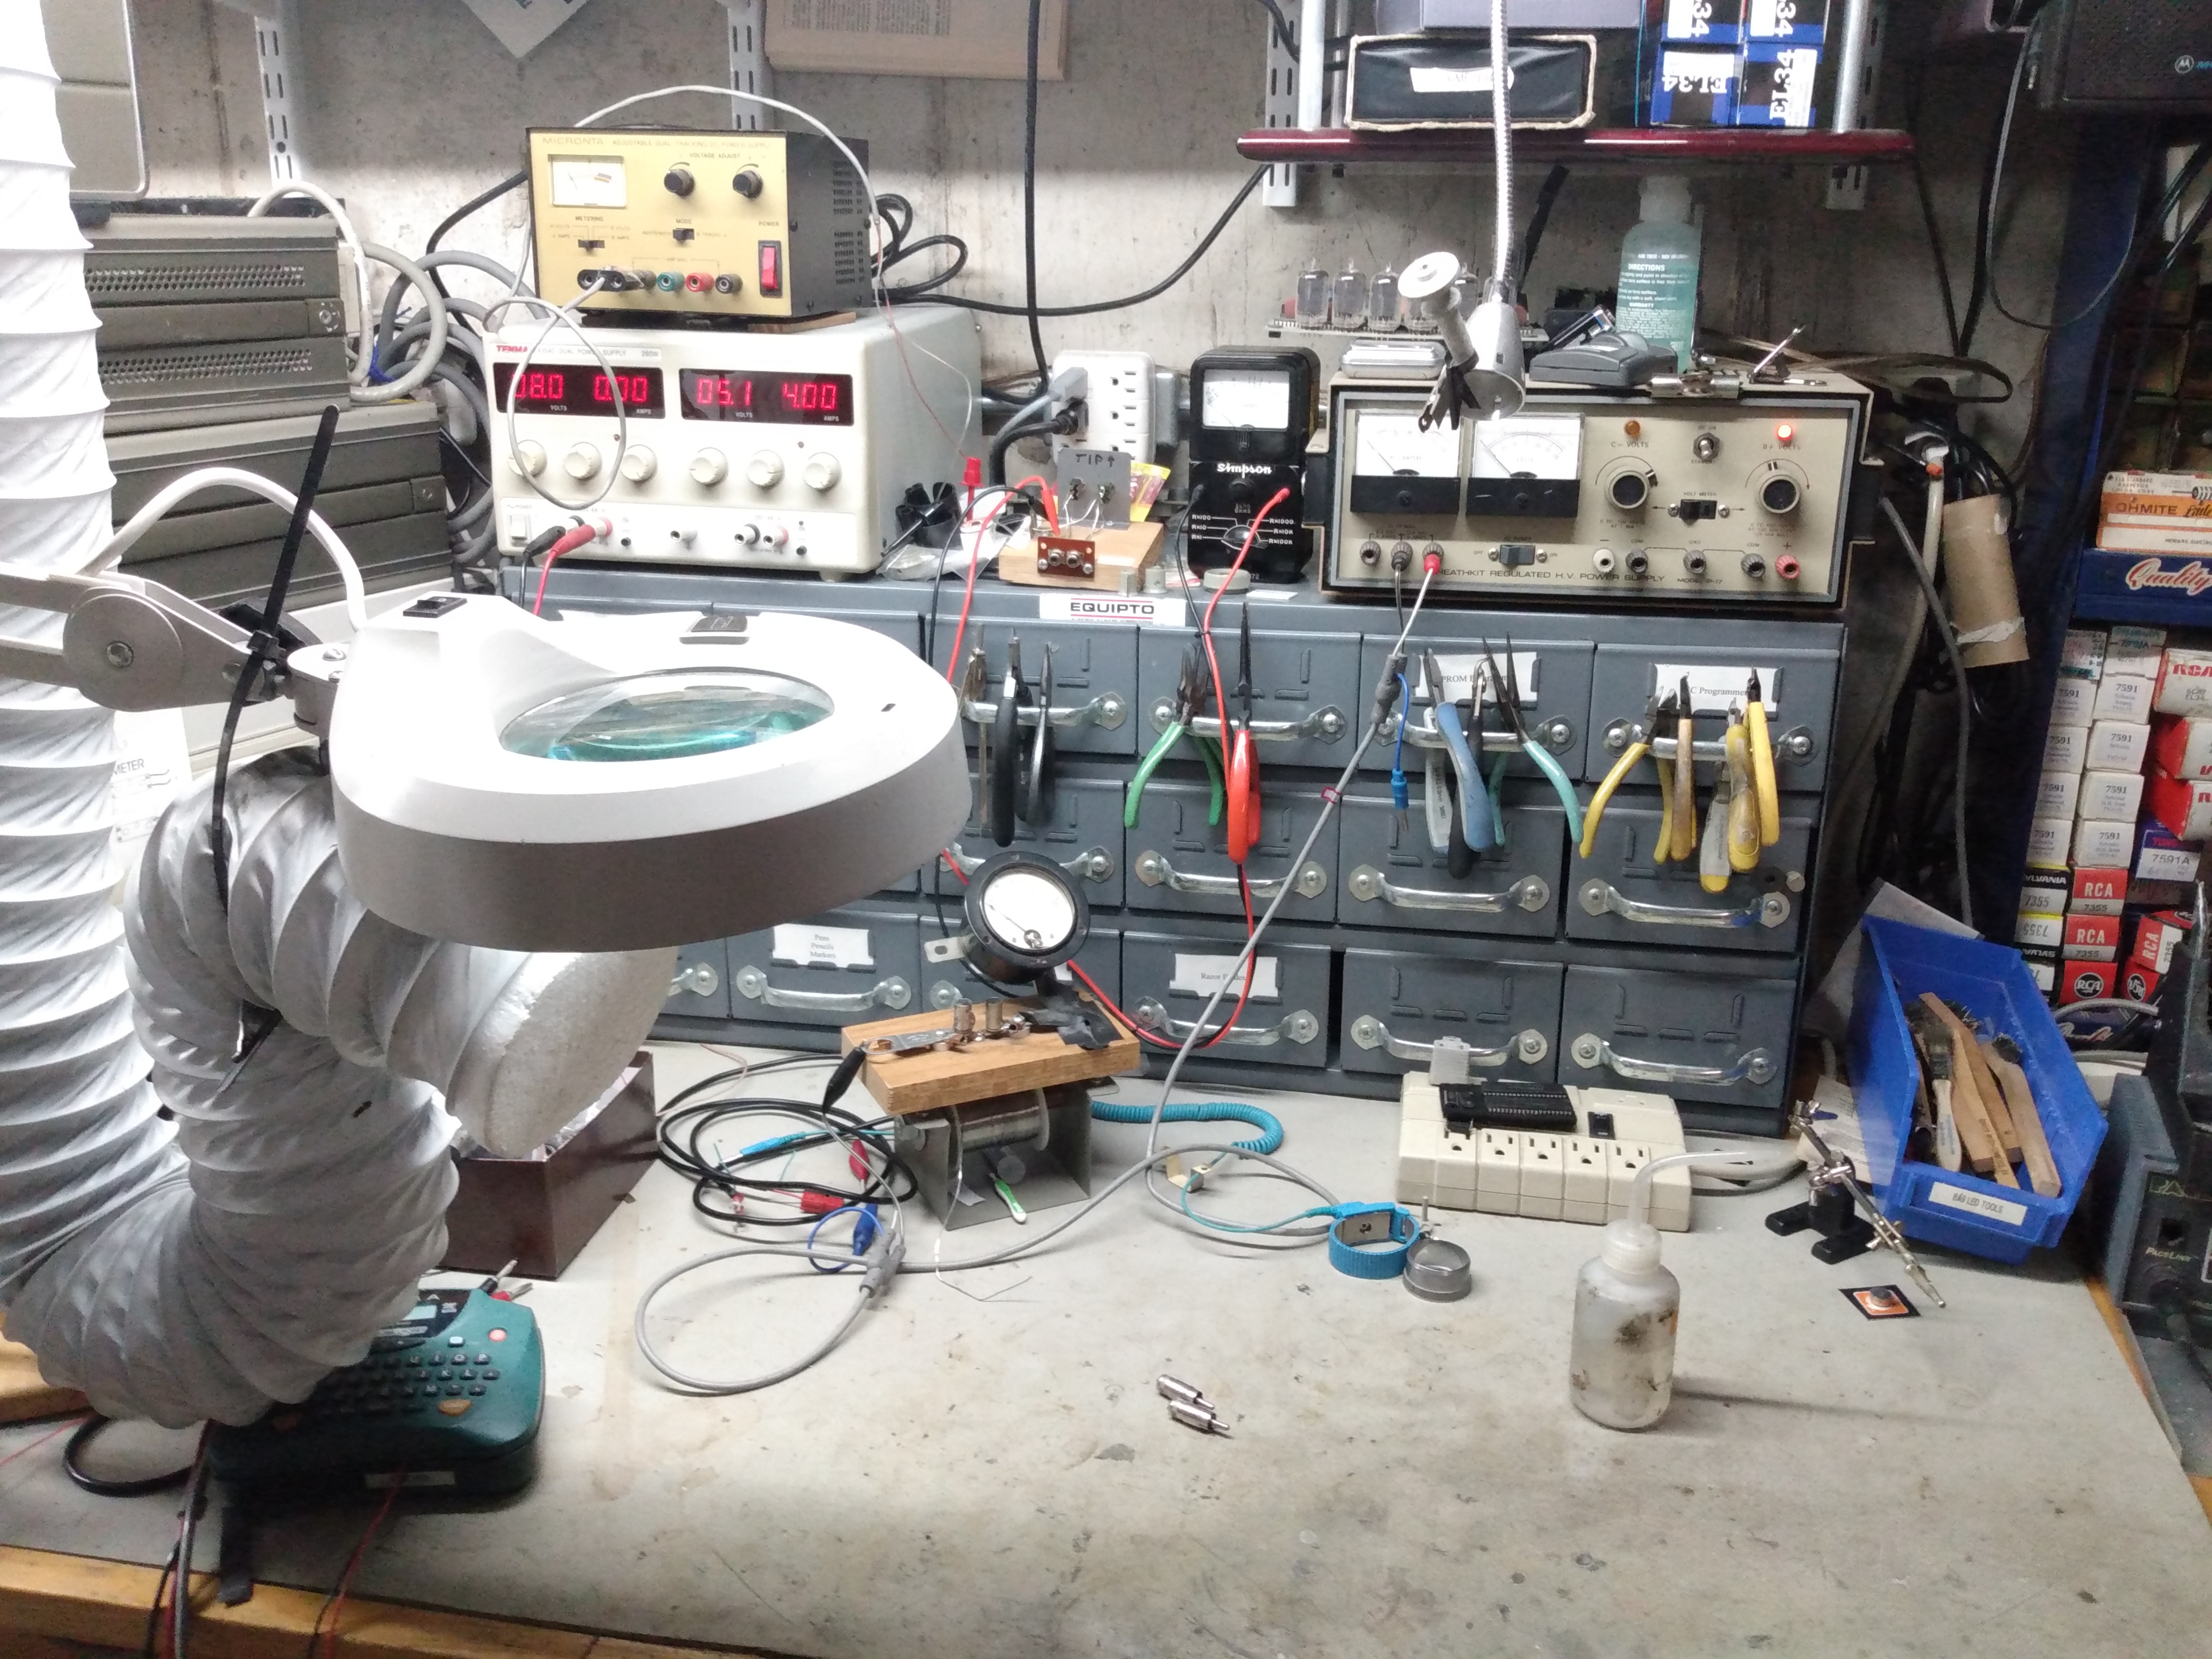 Bench #1 Bench #1 has most of the common hand tools for working on electronics hanging right in front (on the door handles of those storage drawers. The storage drawers also contain other tools or small equipment that gets used periodically. Notice this bench has a dryer hose hanging from it. I do a great deal of soldering and I want to draw away those fumes. This and a second vent hose, for Bench #2 and #3, suck air outside so those toxic fumes are not being breathed in. This bench has limited test gear. The Tenma EX350 Dual 0-35V 0-4A and a Heathkit IP-17 HV power supplies. Those apply power to assembled products during testing. That little black meter in the middle is a vintage Simpson 372 Ohm Meter. The Simpson is used with a dedicated fixture to test all the cable products I turn out here. A side note on this 372, it has a calibration sticker on the side that states this was once the property of the Milwaukee Resistor Company (MRC). I bought this meter at a local hamfest and just had to have it. I worked for Milwaukee Resistor part-time from 1975 through maybe 1978. It started as an afternoon job while in high school and in the summers during my first couple of years at college. At that time they were located only a couple of blocks from my school, on Virginia Street and very near downtown Milwaukee. MRC was located in an old four story building (now converted to condos), where the first floor was a tannery. We where on the 2nd and 3rd floors. Great memories of the old wire-wound resistor winding machines, usually run by ladies. Anyways, thanks for staying with me on this little diversion down memory lane. Now back to my lab! Moving down that same wall to Bench #2. This is where I build, restore and repair longer term projects. It also has most of the test equipment that gets used for home audio related equipment. 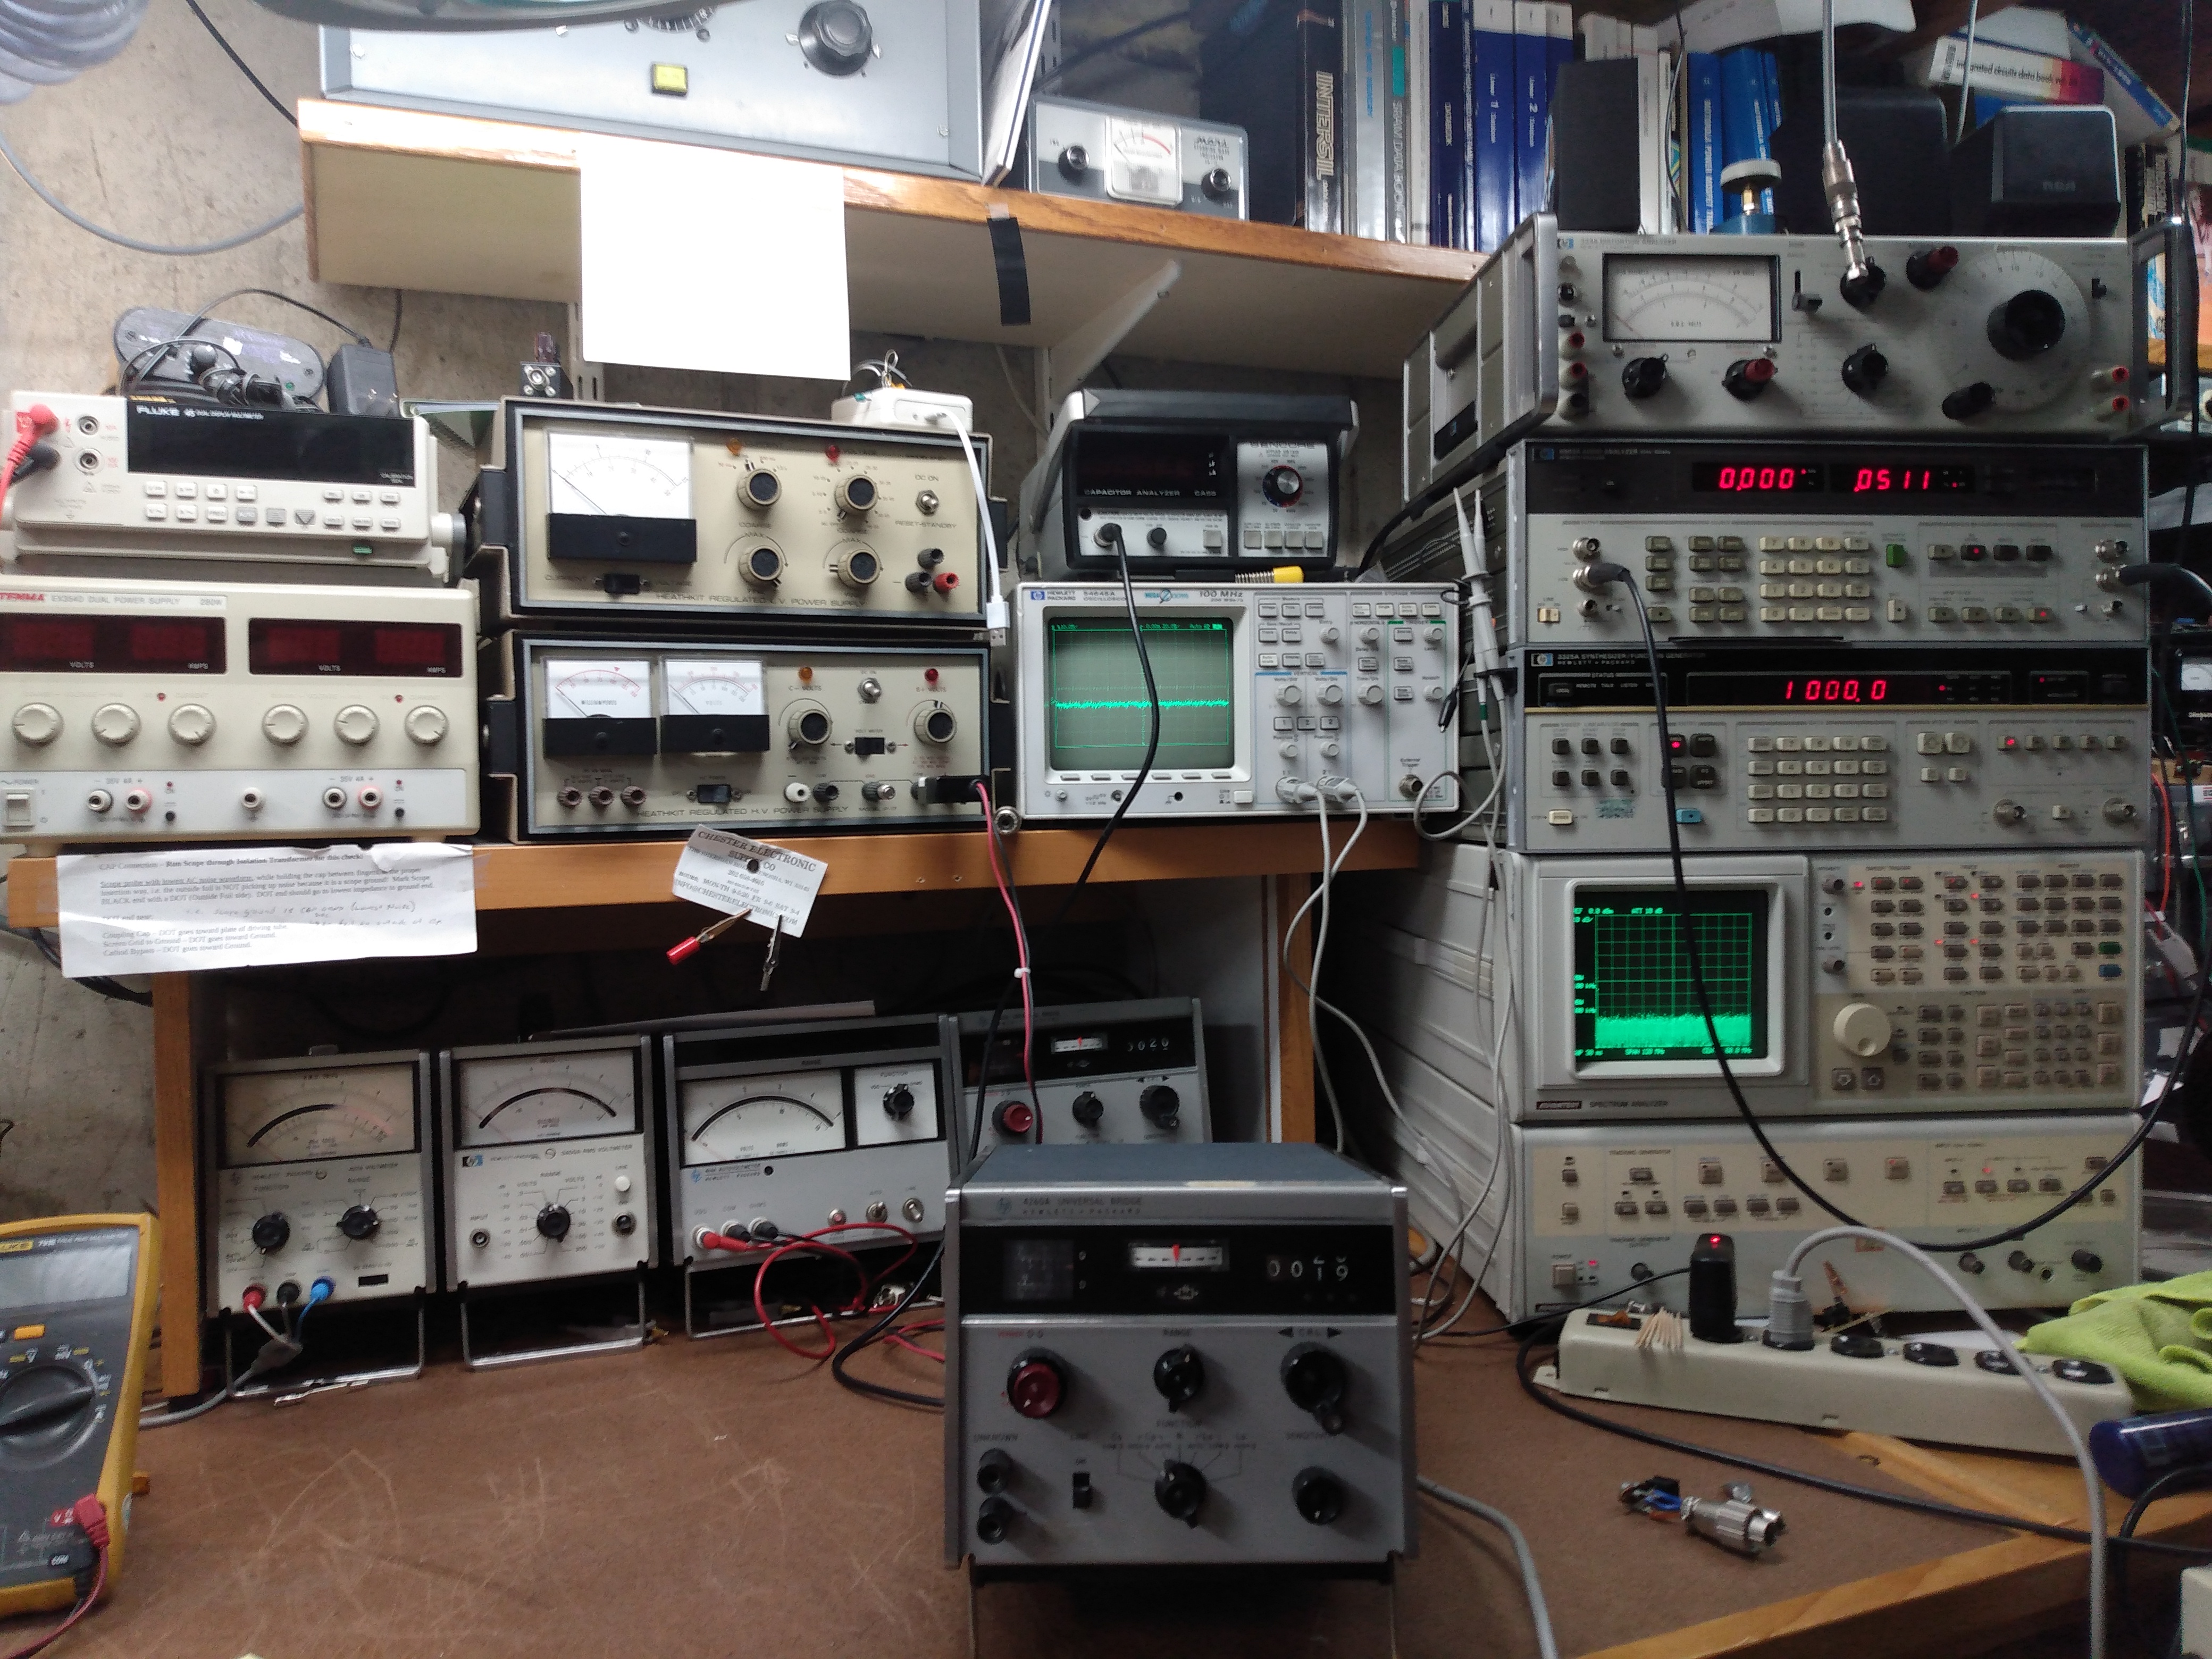 Bench #2 At bench #2
we begin to encounters the 'real' test
equipment.
In no particular order here is what is pictured: First Row (L-R) Fluke 79III (Just snuck into the picture) HP 427 Analog Multimeter HP 3400A Analog True RMS Voltmeter HP 414A Analog Autoranging Multimeter (Very Unique and Rare) HP 4260a Universal Bridge (LCR Meter) - One of the first products that HP had built and designed at Yokogawa HP in Japan. These are very nice and simple to use bridges. And yes that is a second 4260A being tested on the bench. Advantest TR4171A Spectrum Analyzer. Old from the mid-1980's, but excellent for audio works as it starts at 0Hz and goes to 120MHz. Also, it has an secondary high impedance input, which is valuable for aligning IF's in radio receivers. This one is equipped with the full tracking generator too. It is modern enough to use a microprocessor (8086 if I recall correctly). Second Row (L-R) Tenma EX350 Power Supply - Dual Channel 0-35VDC 0-4A Fluke 45 Dual Display DMM 5.5 Digits (on top of Tenma) The Dual Display is neat as the same probes can provide me with a DC voltage reading on one display and the second display can be showing AC Voltage. So you can view a power supplies DC output along with the unwanted AC ripple at the same time. Heathkit IP-17 HV Power Supply with a Heathkit IP-27 LV Power Supply on top of it. HP 54645A 100MHz Digital Scope with GPIB & FFT Option. Sencore CA-55 Capacitance Meter. I like the Sencore for testing capacitors for leakage currents at rated voltages, It can go as high as 600VDC! Stuff stacked on the Advantest TR4171A SA HP 3325A Synthesizer/Function Generator 20MHz max. HP 8903A Audio Analyzer ( Great for checking Distortion (THD) & Noise Levels on Audio Amplifiers) HP 334A Distortion Analyzer (Like an old analog version of the 8903A below it) At the very top Homebrew HF Antenna Tuner and a SWR Bridge for working on old Ham equipment. I can switch any of my outside ham antennas into the lab when needed for the repair and testing of amateur radio equipment. Now we come to the corner of the bench area. There is a large corner shelving unit that holds various test equipment pieces. All test equipmnent located here can be shared between Bench #2 and Bench #3, since those are the benches that are kitty-corner to each other. 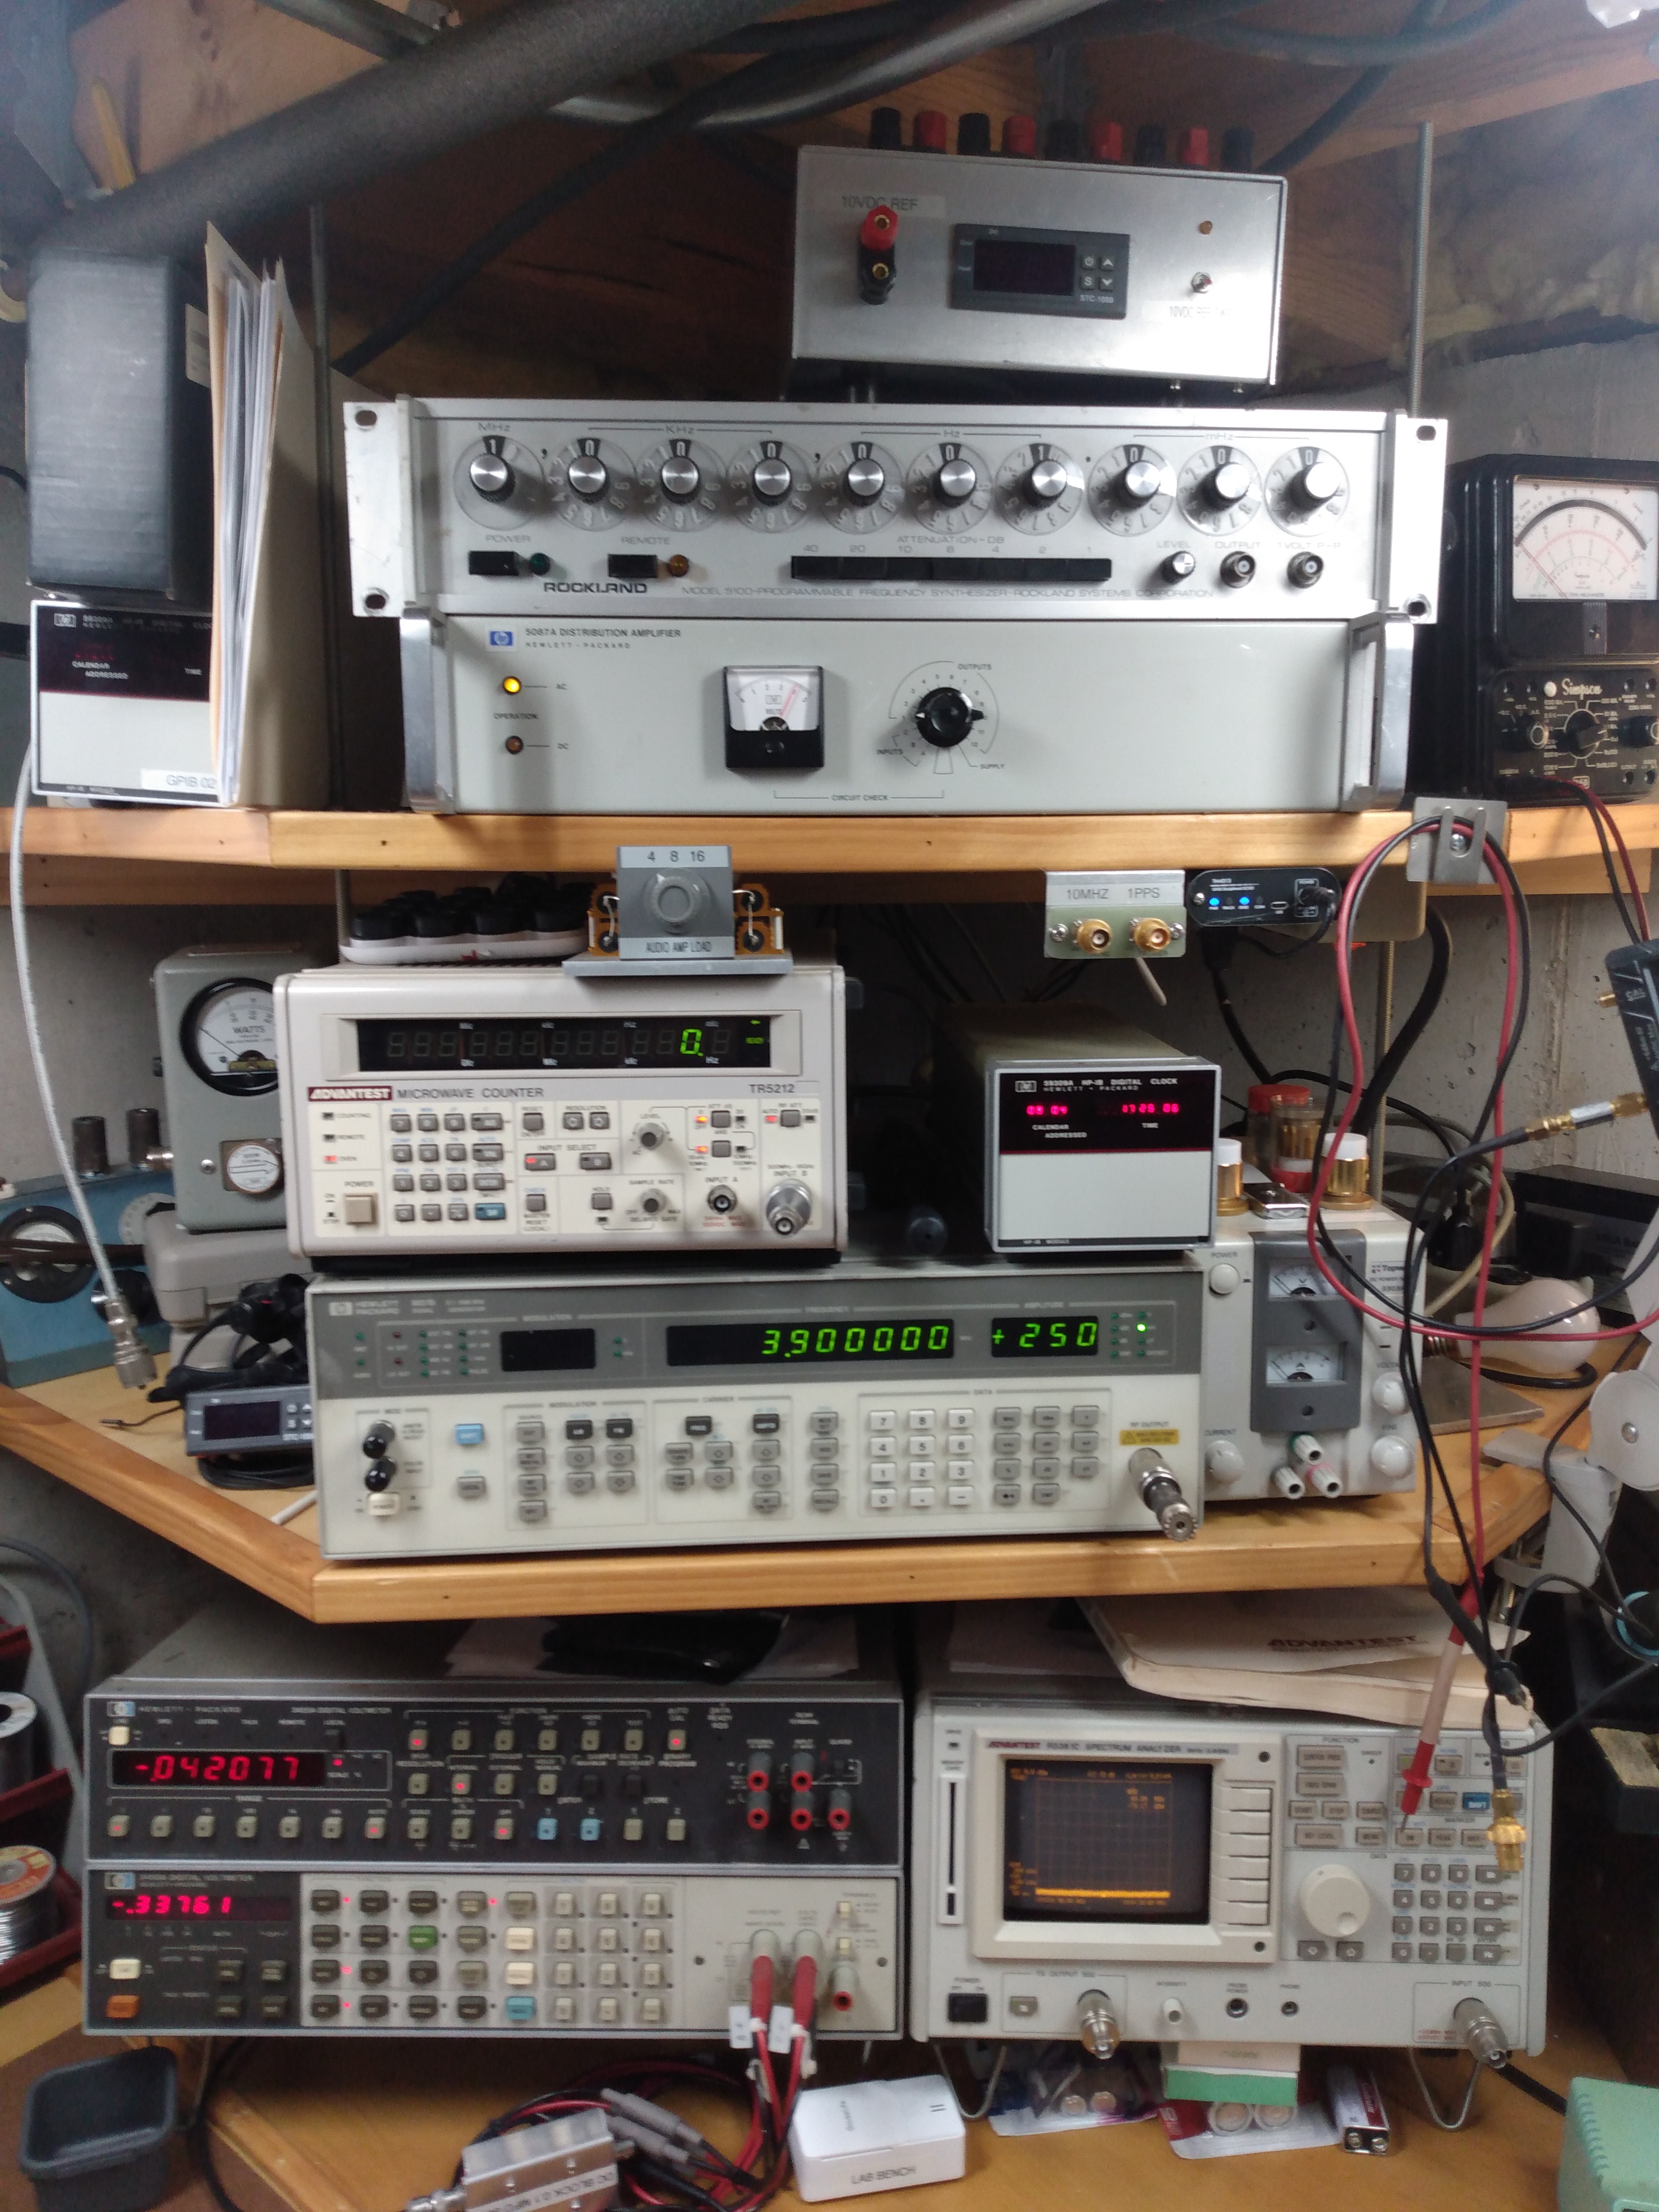 Common
Corner Area
Lower Bench Level (L-R) HP 3456A DMM (6.5 Digit) HP-3455A DMM (6.5 Digit) - On top of 3456A Advantest R3361C Spectrum Analyzer - 9KHz to 2.6GHz Middle Shelf HP 8657B Signal Generator 0.1 - 2080 MHz Advantest TR5212 Microwave Frequency Counter 10mHZ to 18GHZ (Yes that is 10 millhertz!) HP 59309A HPIB Digital Clock. A digital clock/calendar that can supply the date and time to any program running on the HPIB (GPIB) Bus. A good portion of the instruments discussed here have GPIB control and I do have a computer that is setup to control them. So for example, I want to use one of my HP 6.5 digit DMM's to monitor a specific circuit voltage over a long period of time and watch for changes. The HP 59309A could provide the time information when a desired trigger event occurs, like a voltage drop or spike. Topward Power Supply 0-30VDC 0-3A Top Shelf Bottom HP 5087A Distribution Amplifer - Distributes a GPS based 10MHz frequency standard to various frequency dependent test instruments throughout my lab. Rockland 5100 - Programmable Frequency Sythesizer (0-2MHz) Silver Box lying on top - This a temperature controlled Resistance and Voltage standards box used to check and calibrate my labs various meters (Analog and Digital versions). It is frequenctly checked against two calibrated HP 3458A 8.5 Digit DMM's I have access to. Far right is Simpson 260 Series 6MP VOM Not highlighted, but I do have various solder/desolder stations by either Pace or Weller on all my benches. And finally onto Bench #3. Basically a continuation of Bench #2 as far as function is concerned. Yes it has different equipment on it, but because these share the corner, much of the equipment connections can reach both benches. 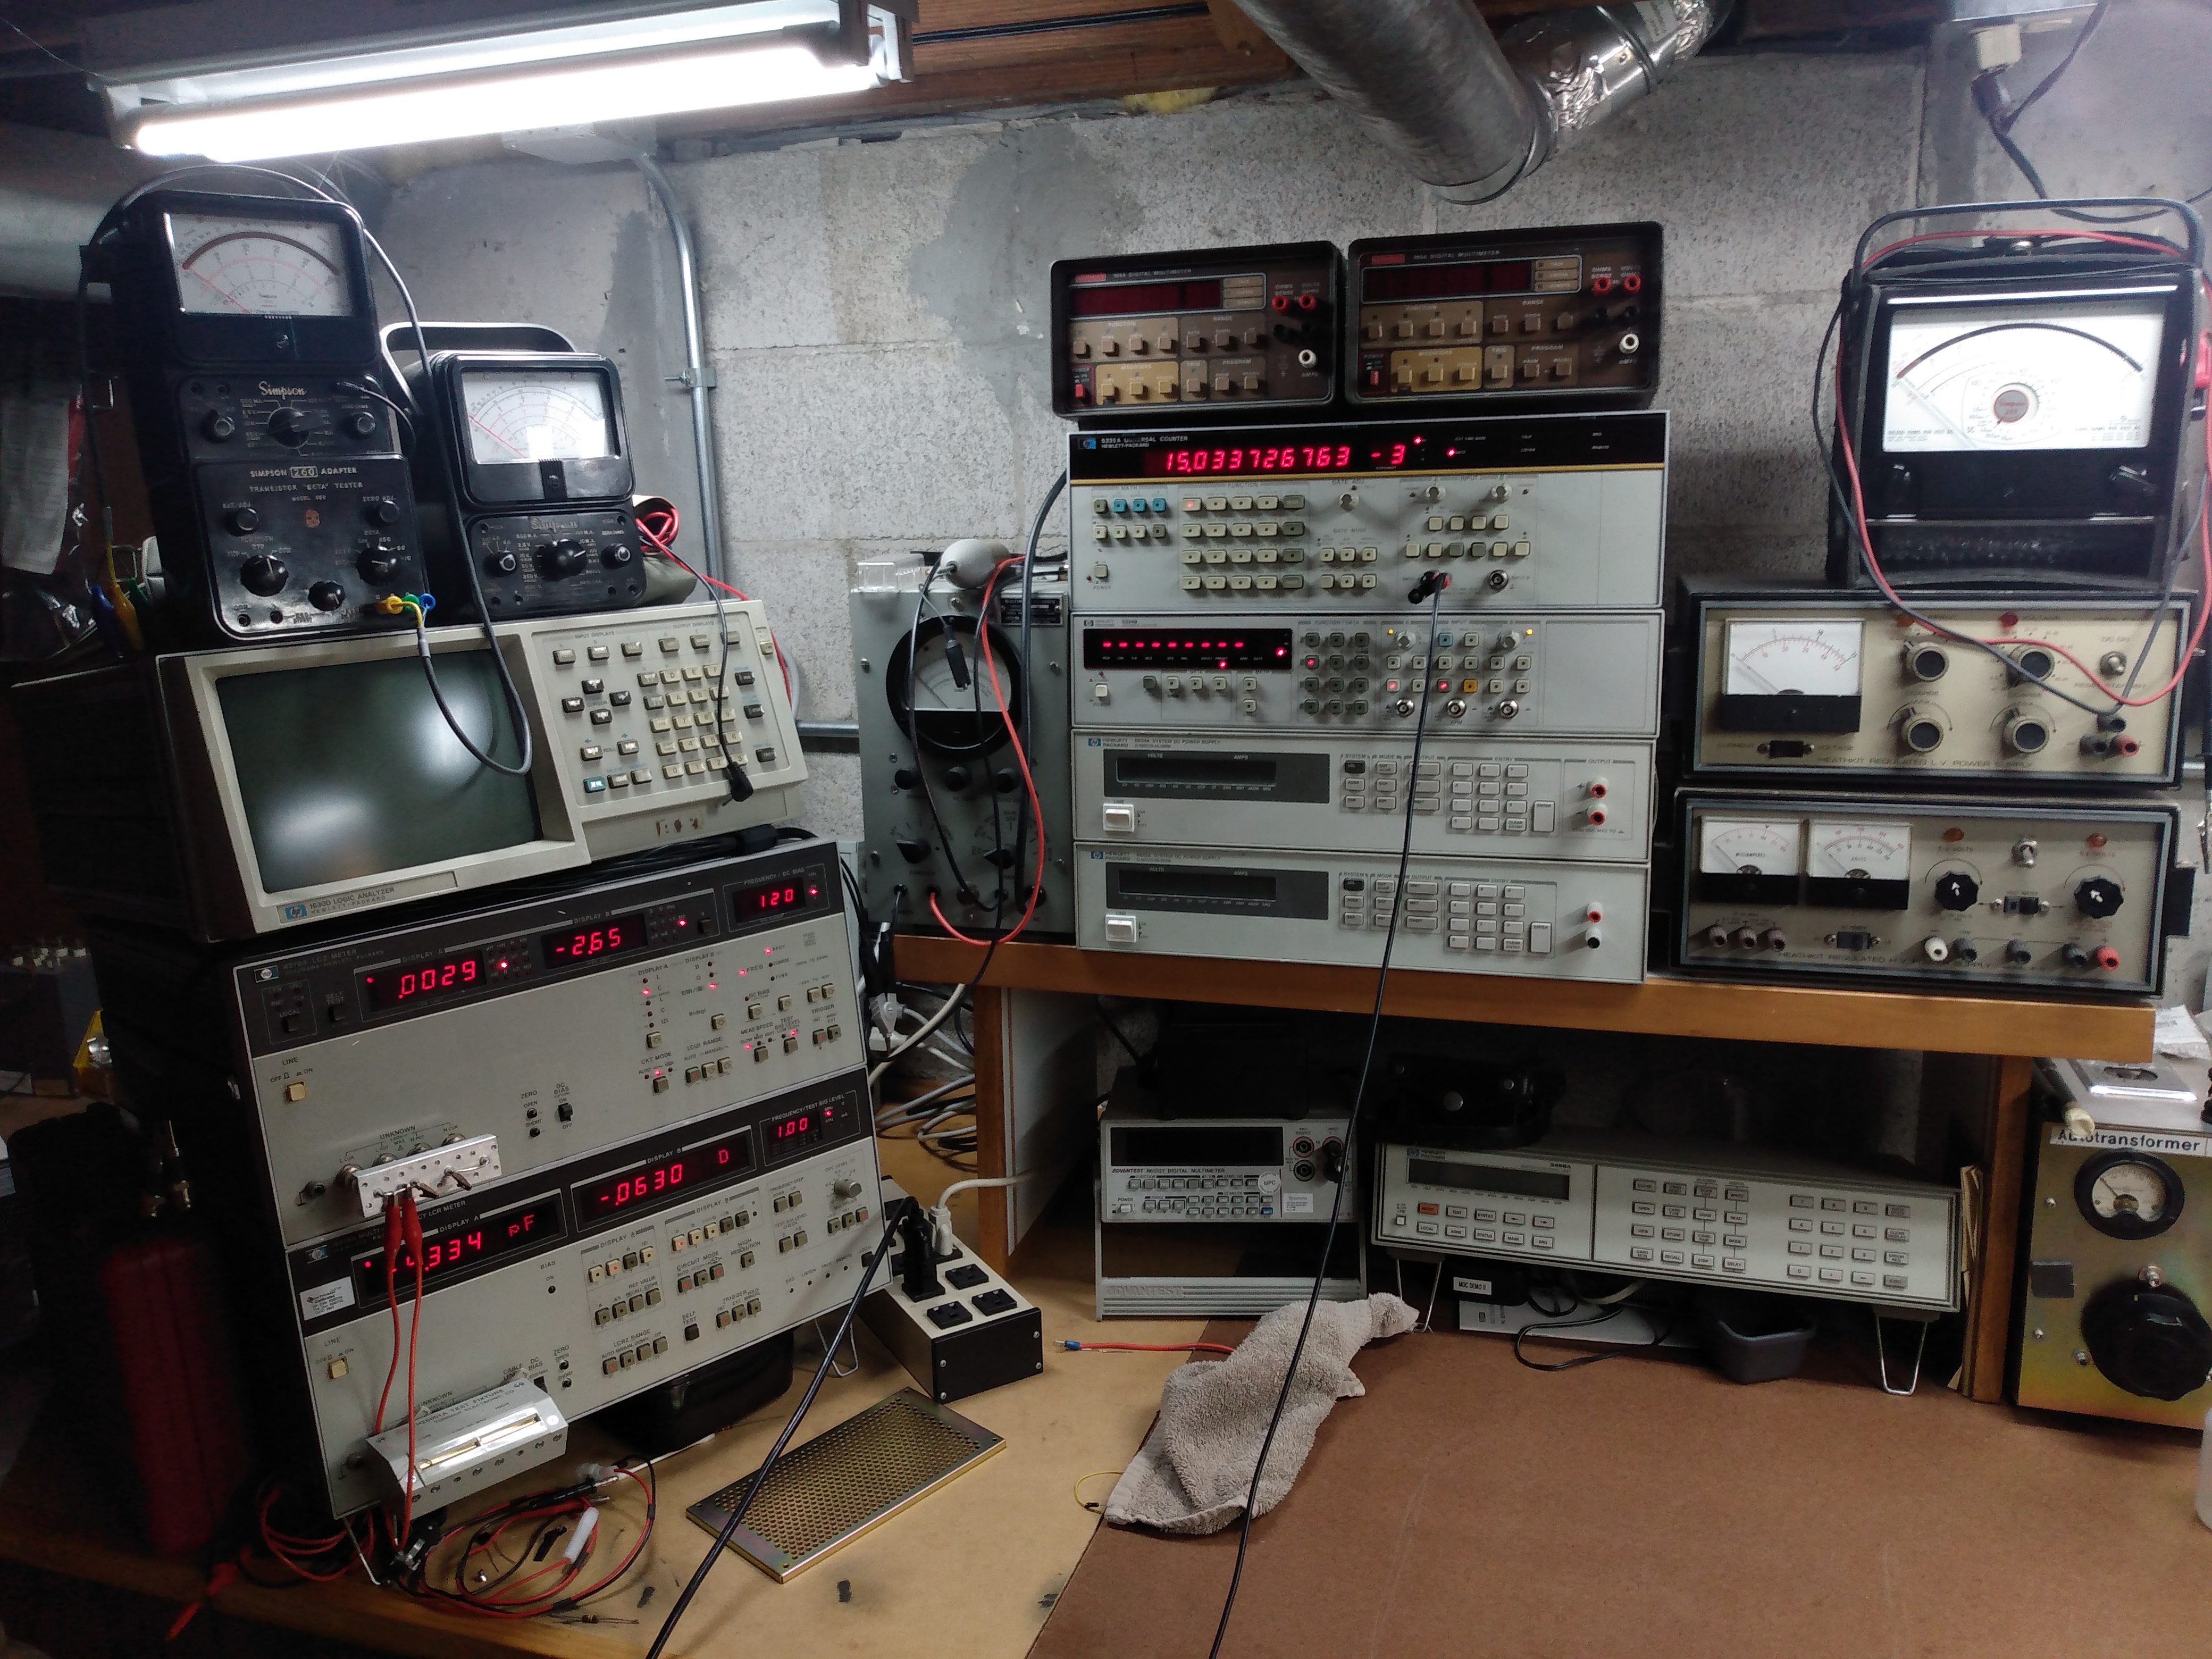 Bench #3 Bench #3 Let's start on the left going from bottom to top of that big equipment stack. Equipment Stack HP 4275A LCR Meter HP 4276A LCZ Meter HP 1630 Logic Analyzer Two Simpson 260 VOM's - Series 6M and Series 2. - Yes. I have several Simpson 260 meters in the lab and they are all in working calibrated condition Center Section - Bench Top L-R Advantest R6552T DMM (5.5 Digit) HP 3488 Relay Switching Unit (GPIB Controlled) AC Autotransformer - 8.5 Amps Center Section - Shelf left stack (bottom-to-top) HP 6633A Power Supply 0-50V 0-2A (GPIB Controllable) HP 6634A Power Supply 0-100V 0-1A (GPIB Controllable) HP 5334A Universal Counter - 100MHz Two Channels HP 5335A Universal Counter - 200MHz Two Channels Keithlee 195A - 5.5 Digit - Digital Multimeter (A Pair of them) Center Section - Shelf right stack (bottom-to-top) Heathkit IP-17 HV Power Supply Heathkit IP-27 LV Power Supply Simpson 269 Series 3 VOM - One of the best old school VOM's out there Notice on the distant Bench #3 picture, at the top of this page, there is a Tektronix 485 (350MHz) scope on the cart. It can be moved to anywhere it's needed in the lab. As was mentioned above, much of this test equipment can be controlled fully using the GPIB (General Purpose Interface Bus). This bus and its protocol were created by Hewlett-Packard (HP) in 1972 and was originally given the name HPIB by them. GPIB is an 8-bit parallel bus and can still be used today via a PC with either a dedicated GPIB controller board or via a USB-to-GPIB converter. Even though today's equipment has converted over to direct USB control, many manufacturers still offer a GPIB option for their test equipment as legacy support. You could go old school and use an original vintage Hewlett-Packard computer that was designed to control GPIB using their integrated BASIC Programinng Language. That is the route I have taken! 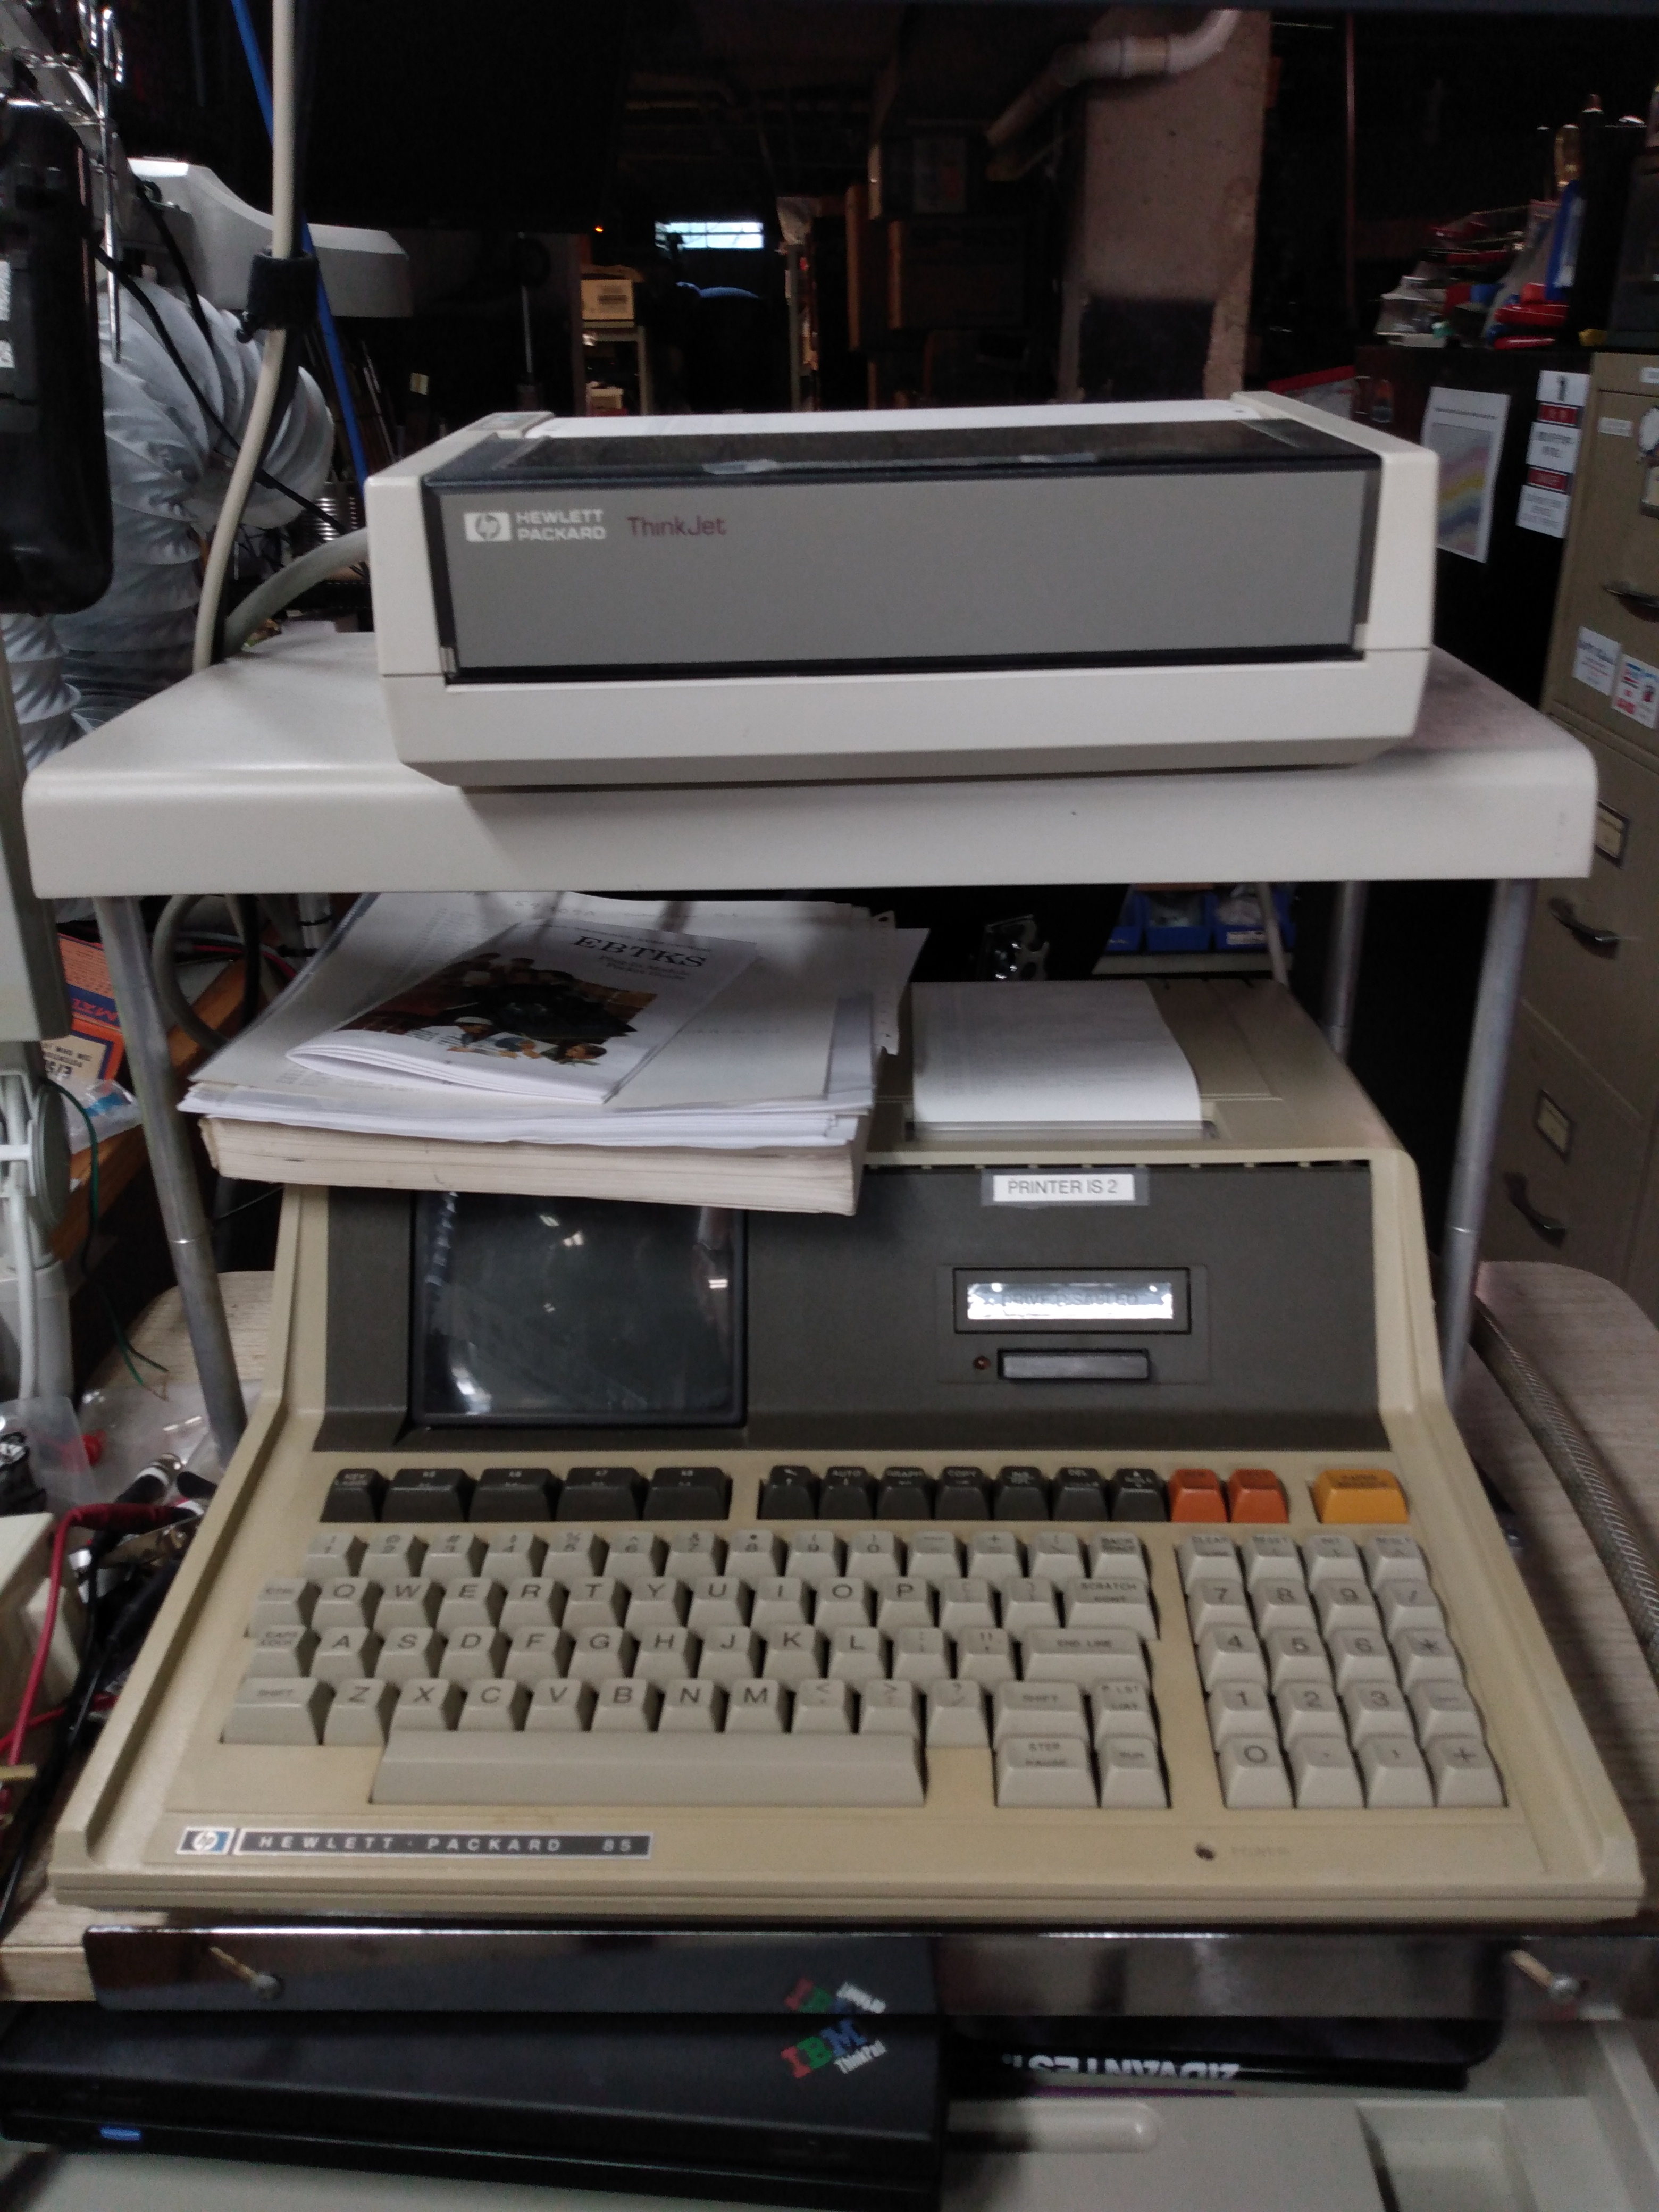 This is my HP 85 computer and a HP 2225A (GPIB Controlled Inkjet Printer). Mine does have a recently created EBTKS I/O board installed which allows the emulation of various vintage HP storage devices, but instead on a modern micro-SD card. A real life saver for this old computer. As part of my business, I have used this HP-85 GPIB setup to write some control programs to evaluate the operation of other test equipment being used by a customer. This allowed me to really exercise their equipment over a long time frame to verify stability and overall accuracy. Not to bad for a computer that was built in 1980! |